Published: August 12, 2026 · 10 min read · Category: Smart Film Guide
Smart film installation sits somewhere between window film application and basic electrical work. The film application side is familiar territory for experienced window film and glass film installers. The electrical side — running power supply, controller wiring, and connecting bus cables to the film — introduces a layer of complexity that pure film installers don’t encounter with solar control or privacy film.
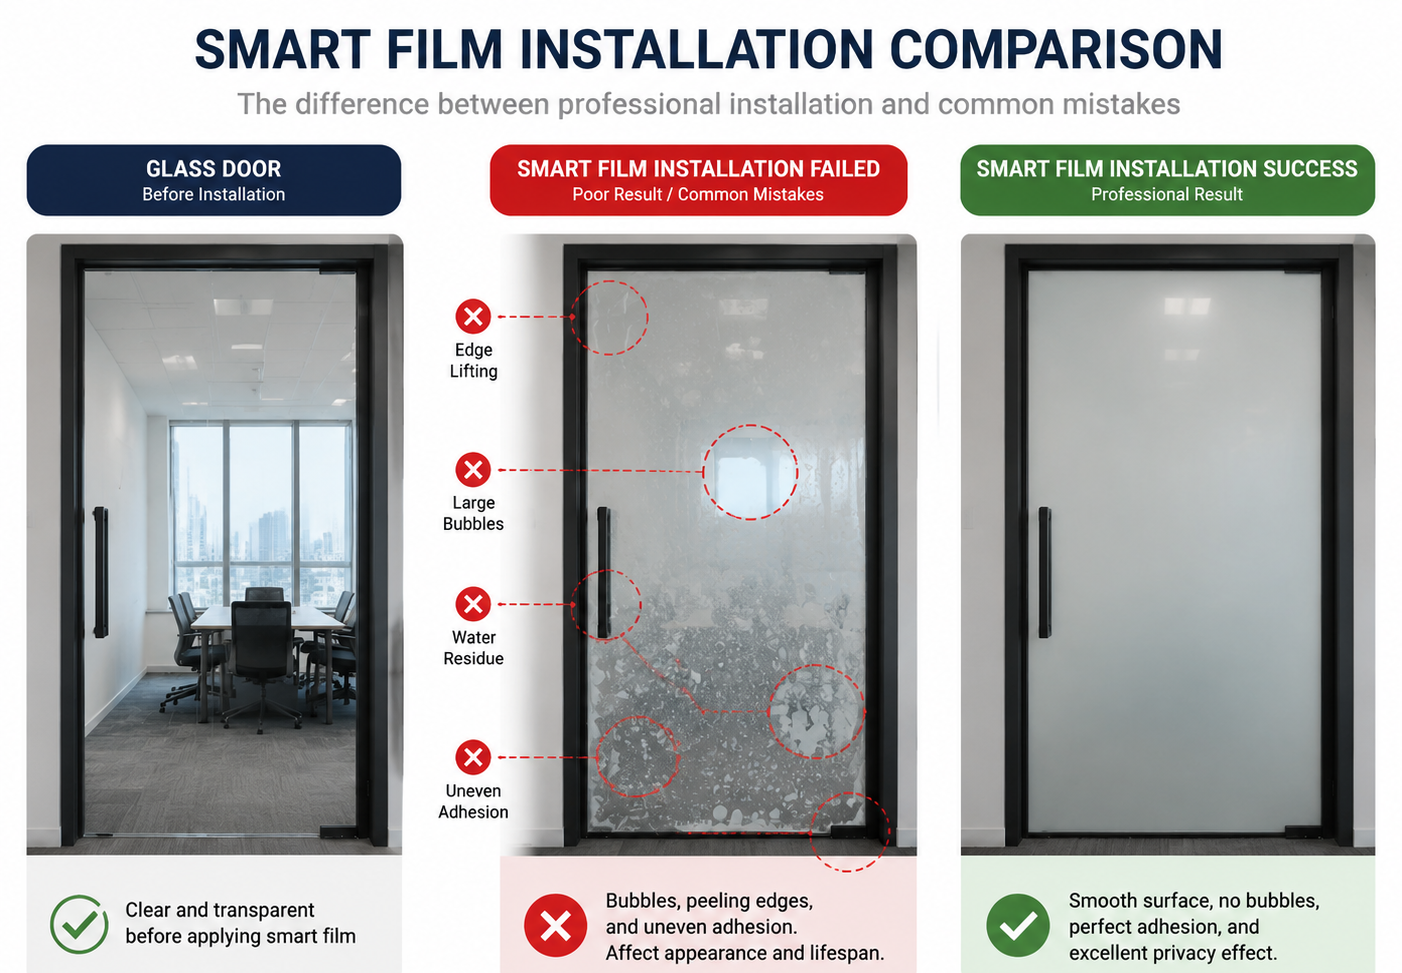
Done correctly, the result is invisible: a glass surface that functions beautifully, with clean transitions and no visible wiring. Done incorrectly, you get uneven switching, bubbling film, and occasionally a warranty void. This guide covers the process that separates good from bad outcomes.
Before You Start: Pre-Installation Assessment
Assess the Glass
Smart film is designed for flat glass surfaces. It does not work on curved or significantly textured glass. Check:
- Flatness: Run your hand across the glass surface. Significant warps or undulations will cause adhesion problems and visual distortion.
- Existing coatings: Some Low-E coatings and reflective window films are incompatible with smart film adhesive. Test adhesion with a sample before committing to a full installation.
- Surface condition: Glass must be clean, free of scratches deeper than 0.1mm, and free of silicone, adhesive residue, or other contamination. Surface contamination is the leading cause of adhesion failure.
- Glass thickness: Most smart film is compatible with glass from 4mm to 12mm. Confirm compatibility for your specific product.
- Temperature at installation: Film should be applied at temperatures between 15°C and 35°C. Cold glass or cold adhesive creates adhesion problems. Allow glass to reach ambient temperature in a heated space if it’s been exposed to cold.
Electrical Planning
Before ordering film, map out the electrical requirements:
- Power supply location: The transformer needs to be within appropriate cable run distance from the film. Plan where it will be mounted — inside a wall cavity, above a ceiling, in a service cupboard.
- Cable routing: Bus cables run from the transformer/controller to the film’s edge connections. Plan the routing path so cables are concealed within wall cavities, cable ducts, or skirting — visible surface-run cable looks unfinished and is a common sign of amateur installation.
- Circuit capacity: Calculate total film area × 7W/sqm to determine the power supply required. Add 20% safety margin.
- Control requirements: Determine switch locations, whether smart home integration is required, and whether dimming functionality is needed. This affects controller selection.
Required Tools and Materials
For film application:
- Squeegee (hard rubber, no felt edge)
- Hard card tool for edge finishing
- Utility knife with fresh blades
- Spray bottle with application solution (water + 2–3 drops of baby shampoo per litre)
- Lint-free cloths or paper towels
- Measuring tape and marking tools
- Heat gun (for edge pressing and conforming to slight irregularities)
For electrical:
- Smart film power supply (transformer, rated appropriately for total film area)
- Controller (wall switch, touch switch, or smart controller depending on specification)
- Bus cable and bus connectors appropriate to the film product
- Wire stripper, crimping tool
- Cable clips or trunking for cable management
- Multimeter for testing before and after connection
Step-by-Step: Film Application
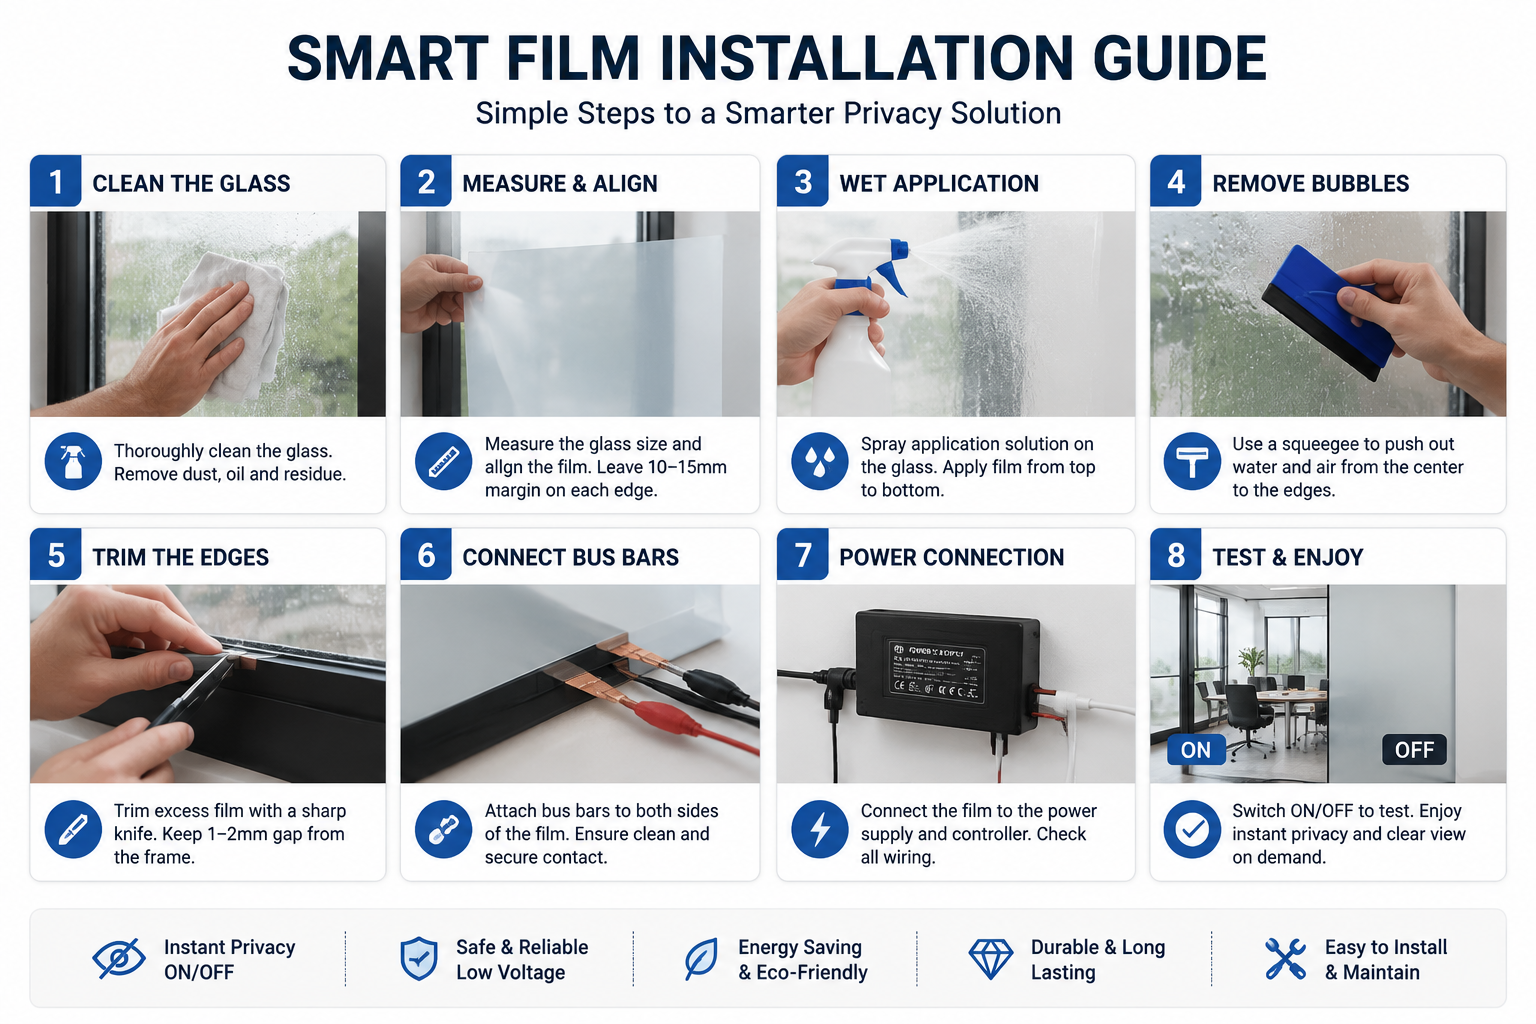
Step 1: Surface Preparation
This step determines the quality of everything that follows. Do not rush it.
Clean the glass thoroughly: first pass with an isopropyl alcohol solution to remove silicone, grease, and adhesive residue, then a final clean with the application solution. Use a clean squeegee to evacuate the cleaning solution. Look at the glass from an angle in raking light — any remaining contamination or water marks will be visible. Clean again if needed.
Remove any hardware (door handles, suction cups, adhesive hooks) from the glass or immediately adjacent frame if they’ll obstruct the film edge.
Step 2: Cut the Film to Size
Measure the glass dimensions. Cut the film to size leaving 10–15mm excess on each edge — you’ll trim to final size after application.
Important: smart film has a directionality. Check the manufacturer’s instructions for which face receives the application solution. Applying to the wrong face (adhesive side vs. non-adhesive) is an unrecoverable mistake.
For large panels, pre-cut the film in a clean workspace before bringing it to the glass. Handling large pieces of cut smart film in a tight installation space is difficult.
Step 3: Apply the Film
Spray the glass surface generously with application solution — it should be visibly wet. This solution layer allows the film to be positioned and repositioned before it sets.
Peel back approximately 30cm of the release liner. Hold the film with the adhesive side facing the glass and align the top edge. As you press the film against the wet glass, continue peeling the liner progressively — keep the liner at a low angle (30–45°) and maintain smooth, continuous motion.
Work in a dust-controlled environment if at all possible. Every dust particle that gets under the film is a permanent defect.
Step 4: Squeegee Out the Solution
Starting from the center of the panel, work outward toward the edges with firm, overlapping squeegee strokes. The goal is to evacuate all the application solution and any air bubbles from under the film.
Use progressively harder pressure on each pass. The film should visibly become more adherent as solution is evacuated. Work methodically — chasing bubbles from center to edge, not from one side to the other.
At the edges, use a hard card tool to press the film firmly into the glass-frame junction and work out the last of the solution.
Step 5: Trim to Final Size
With the film adhered and most solution evacuated, trim to final size using a sharp utility knife against a straight edge. Leave 1–2mm clearance from the frame to prevent edge lifting from frame movement.
Cut cleanly and in a single pass — multiple scoring passes create ragged edges that are both visually poor and more prone to lifting over time.
Step 6: Final Squeegee and Inspection
After trimming, a final firm squeegee pass across the entire film surface. Check from multiple angles in raking light for remaining bubbles or solution pockets.
Small residual water bubbles (less than 5mm) near edges will typically disappear within 24–72 hours as the remaining solution migrates out through the film edge. Larger bubbles, or bubbles in the center of large panels, require intervention — press firmly with a squeegee card to drive them toward the edge.
Bus Cable Connection: The Electrical Step
This is where smart film installation differs from standard window film application, and where the most common problems occur.
Smart film has an electrically conductive ITO layer on each surface. The bus cable connects to these layers via conductive adhesive strips (bus bars) at the film edge. Depending on the product, connection may be via:
- Pre-installed bus bars: Some products come with bus bars already laminated to the film edge. Connect the supply cables to the terminal points.
- Conductive adhesive tape installation: Other products require the installer to apply conductive copper or silver tape to the trimmed film edge, creating the bus bar contact.
Critical installation points:
Both conductive layers must be connected. Smart film requires electrical contact to both ITO layers — typically from opposite edges of the film. Connecting only one side will result in partial or no switching.
Bus bar contact must be clean and complete. Contamination, gaps in the conductive tape, or insufficient contact pressure on the connection will result in uneven switching — sections of the film that don’t respond or respond slower than adjacent areas.
Cable runs must be appropriate gauge. Undersized cable creates voltage drop over long runs, which affects switching performance. Follow the manufacturer’s specifications for cable gauge vs. run length.
All connections must be waterproof in appropriate environments. Bathroom, shower area, and exterior-adjacent installations require waterproof electrical connections.
Power Supply and Controller Connection
Power supply selection: Match the transformer output to the film’s operating voltage (typically 48–65V AC) and ensure the VA (volt-ampere) rating covers total film area × 7W/sqm + 20% safety margin. A single transformer can power multiple panels if the total load is within rating.
Controller installation: Wall controllers are typically flush-mounted in standard back boxes. Wiring follows the controller manufacturer’s diagram. For smart home integration, confirm the controller’s protocol compatibility before installation.
Testing sequence:
- Before connecting film: test transformer output voltage and frequency with multimeter
- Connect one panel, switch on: verify complete, even switching
- Check for any patchiness or uneven areas at full transparency — these indicate ITO contact issues
- Test dimming function if applicable: transition should be smooth and even
- Verify switching speed meets specification
- Connect remaining panels, retest
Common Installation Problems and Solutions
Uneven switching / patchy transparency: Most often caused by poor bus bar contact. Remove and reapply bus bar connection, ensuring clean, complete contact across the full film edge. Also check for ITO layer damage from aggressive edge trimming.
Film bubbling after installation: If bubbles appear after a few days: likely residual application solution migrating. Usually resolves within 1–2 weeks. If bubbles appear weeks later: adhesion failure — check for surface contamination at that location, assess whether glass surface was adequately prepared.
Film not switching at all: Check power supply output (multimeter on transformer secondary). Check bus cable continuity. Check that both ITO layers are connected. Confirm operating voltage matches film specification.
Visible wiring: A planning and installation quality issue. Wiring should be routed before film application in new construction. In retrofit, cable trunking, skirting channels, and frame routing manage cable. Surface-run cable is avoidable with adequate planning.
Film edge lifting: Check trim clearance from frame — film trimmed too tight to the frame can be displaced by frame movement. Check application solution was fully evacuated before trimming. In high-humidity environments, ensure the glass-frame junction is sealed against moisture ingress.
Maintenance
Smart film requires minimal maintenance once installed:
- Clean with non-abrasive, pH-neutral glass cleaners
- Avoid abrasive cleaning tools (scrubbers, steel wool) on the film surface
- Do not use ammonia-based or solvent-based cleaners
- If edge lifting develops at any point, address it early — a small lifted edge is easily re-adhered; an extensive lifted section typically requires section replacement
When to Use a Professional Installer
For residential projects with small glass areas and straightforward electrical requirements, competent DIY installation is achievable. For commercial projects, large panels, complex electrical integration, or any installation where the glass is difficult to replace if something goes wrong — use a professional smart film installer.
Mistakes on a 10sqm conference room partition are expensive. Professional installation has a clear ROI in those contexts.
FAQ
1. Can smart film be installed by yourself?
Yes, small residential installations can be done by experienced DIY users, but electrical wiring and bus bar connections require proper technical knowledge for safe and stable performance.
2. What is the most important step in smart film installation?
Surface preparation is the most critical step. Any dust, grease, or silicone on the glass can cause bubbles, poor adhesion, or installation failure.
3. Why does smart film not switch properly after installation?
The most common reasons are poor bus bar contact, incorrect power supply voltage, or damaged ITO layers. These issues lead to uneven or failed switching performance.
Further Reading
On this site:
- What Is Smart Film? Everything You Need to Know — Product overview before installation
- How Does Smart Film Work? — Understanding the technology helps diagnose installation issues
- What Certifications Should a Window Film Manufacturer Have? — Certification framework applicable to smart film suppliers
- PDLC Smart Film: Applications, Technical Realities, and Regulations by Region— Global use cases, real specs, and local codes.
- More Than Just Manufacturing: Ten Secrets to KSB’s Rise as a Global Leading Switchable Smart Film Supplier— The tech, the tactics, and the ten secrets behind KSB’s rise.
External:
- IEC 60950 Electrical Safety Standard — Relevant low-voltage electrical safety requirements for smart film installations
- NFRC Window Film Installation Resources — Reference standards for film installation
- KNX Association — Building Automation — Smart home protocol integration reference
Get a Free Sample or Quote
Looking for a reliable window film supplier? Contact us today for fast response and professional support.